Practical no:-01
Safety Rules
Practical no :- 02
Tools& Equipment
Tester:-
Electricians use these electrical testers every day to see if a circuit or device is energized. They are crucial safety tools that keep electricians out of harm's way and tell them if there is trouble on a circuit or device. There are several different types of testers on the market, some with specific purposes only and some with multiple testing features. Here are the top 6 electrical testers used by professional electricians.
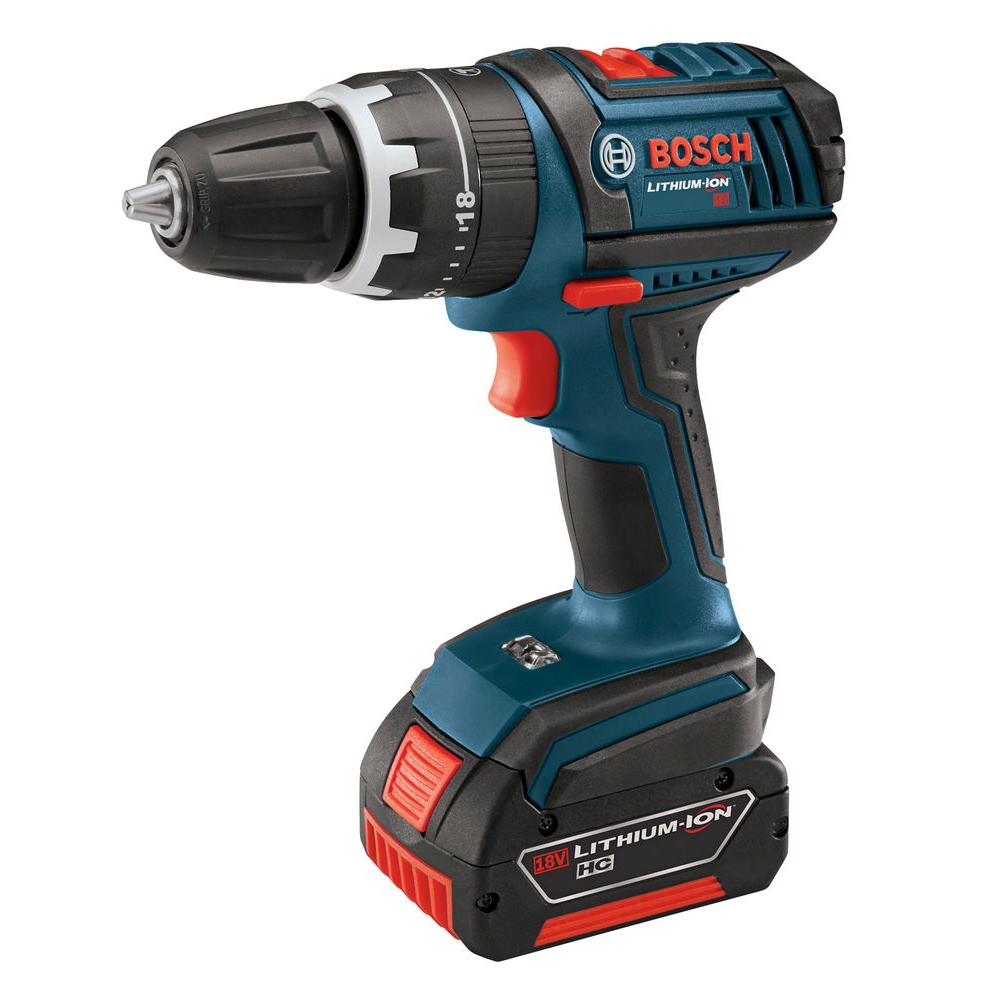
Drill machine:-
We use drill machine to making hole in wall and those palace their required a drill. especially we use drill machine to fix a board and casing and capping fittings.
Screw driver:-
Screwdriver, tool, usually hand-operated, for turning screws with slotted heads. For screws with one straight diametral slot cut across the head, standard screwdrivers with flat blade tips and in a variety of sizes are used.

Hammer:-
A hammer is a tool or device that delivers a blow to an object. Most hammers are hand tools used to drive nails, fit parts, forge metal, and break apart objects. Hammers vary in shape, size, and structure, depending on their purposes.

Wire stripper:-
 Doing electrical work for a profession, home maintenance, or even as a hobby requires that you have a few specific tools on hand. Among them are pliers and wire strippers. These simple hand tools may not look like much at first glance, but the benefits of having them as part of your toolbox are many. To begin with, both pliers and strippers come with wire cutters and possibly even crimpers, which can make any electrical job much easier and neater to perform.

Practical no :- 03
Symbols
electric symbols


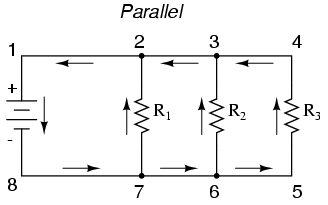
parallel circuits - In parallel arrangement each circuits event is connected to the terminal of the battery independent of the other circuit elements voltage are same.
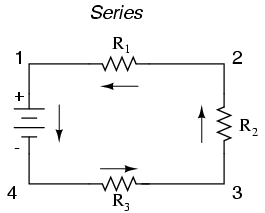
series circuit- In a series circuit the current through each of the components is the same and the voltage across the circuit . the circuit is same of the voltage across each components current is same and voltage are divided.
Practical no :- 08
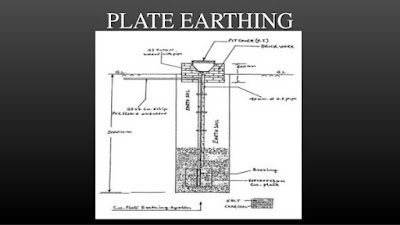
Healthy earthing
Aim:- Creating a healthy earthing .
Tools:- Shovel , tub, par, plier, stripper.
Materials:- Coal, salt, g.i pipe, pvc pipe, wire.
Procedure :- 1) We want to create a healthy earthing
2) we were facing a problems which was of rocky soil condition .
3) we decide to make it an artificial earthing .
4) we digging the soil by measuring 4 feet.
5) Then we insert g.i pipe
6) we layered a hit by salt coal and bricks .
7) we poured some water to finish to end.
Observation:- we saw that land condition was rocky thus making an earthing there a big risk because there is more resistance in rock then soil.
water would not get observed because there were rocks.
Practical no:- 12
Ohm's law Aim:- To study about Ohm's law
Required:- Resistor about 5 ohm, ammeter, voltmeter, plug, holder, wire, bulb etc
Procedure:- 1) Draw the circuit diagram first 2) Arrange all apparatus as per circuit diagram. 3) Make connections as per circuit diagram. all connection must be neat and tight take care to connect the ammeter and voltmeter with their correct polarity ( +ve to +ve and -ve to -ve ) 4) Pass through supply in bulb and count volt and current by according ohm law
# Ohm's law The potential difference (voltage) across and ideal conductor is proportional to current through it the constant of proportionality is called " Resistance" R Ohm's law is given ;- V=IR where V is the potential difference between two point which include a resistance R
# Ohm' law formula V=IR
# Ohm's law circuit diagram
 Practical no:- 13 Bio gas
Aim:- To use bio gas plant
Required:- fresh dung, water, meter tape, calculator etc.
Procedure:- 1) Mix a fresh dung and water with right proportion in the inlet tank as per capacity of bio gas plant . 2) Continue the above procedure in summer winter and rainy season for minimum seven days regularly .
3) Observe the production of gas during feed period

Practical no:- 14 Weather record
Aim:- to know about humidity, temperature in our environment .
Required:- book, pen, dry bulb, wet bulb, thermometer.
Procedure:- First we know about humidity. What is humidity and temperature. dry and wet bulb.
# How to find humidity, temperature, and rainfall.
# Humidity:- Humidity is the amount of water vapor present in the air. water vapor is the gases state of water and is invisible to the human eye.
# How to measured humidity:- First take take two thermometer. Dry bulb and Wet bulb difference between dry and wet bulb ex:- 22 dry and 15 wet different is 7 Take humidity chart and find humidity.
# Temperature:- Temperature is a physical quantity expressing hot and cold temperature is measured with a thermometer.
# How to measured temperature:- Watch in the thermometer mercury is present in which number of Centigrade


Practical no :- 15
Safety Rules
- While we touching any electrical wire first we have to off main switch.
- When we are not off main switch we have to work use rubber gloves and rubber shoes to do work.
- we work at transmission lines we wear rubber gloves depending on voltage and we should take the gloves at elbow.
- we should use line tester while checking wire .
- we should use tools those are properly insulated.
- we use tools they are good condition.
- when we are working in current flowing line that time must wear hand-gloves.
- If you switch off any connection for working that time anchor one board their that is work in progress because any one may not switch on the light.
- when you are work in electrical line in that time do your work with safety.
Practical no :- 02
Tools& Equipment
Tester:-
Electricians use these electrical testers every day to see if a circuit or device is energized. They are crucial safety tools that keep electricians out of harm's way and tell them if there is trouble on a circuit or device. There are several different types of testers on the market, some with specific purposes only and some with multiple testing features. Here are the top 6 electrical testers used by professional electricians.
Drill machine:-
We use drill machine to making hole in wall and those palace their required a drill. especially we use drill machine to fix a board and casing and capping fittings.
Screw driver:-
Screwdriver, tool, usually hand-operated, for turning screws with slotted heads. For screws with one straight diametral slot cut across the head, standard screwdrivers with flat blade tips and in a variety of sizes are used.
Hammer:-
A hammer is a tool or device that delivers a blow to an object. Most hammers are hand tools used to drive nails, fit parts, forge metal, and break apart objects. Hammers vary in shape, size, and structure, depending on their purposes.
Wire stripper:-
A wire stripper is a portable handheld tool used by workers, especially electricians, for removing the protective coating of an electric wire in order to replace or repair the wire.
electrician Plier:-
Practical no :- 03
Symbols
electric symbols
practical no :- 04
Wire type and joint

Practical no:- 05
Electric Basics
Electric basic means Trip, load, short-circuit,open circuit, close circuit, transformer, conductor, fuse, wire, etc
practical no :-06
Load calculation
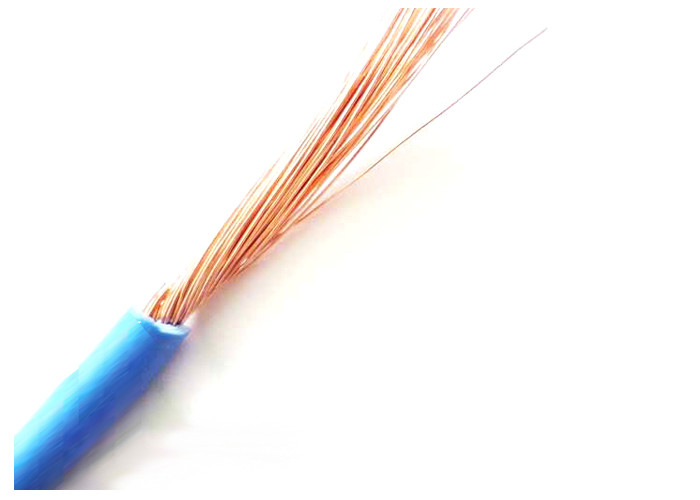
Wire type and joint
- Type of wire :- mainly two type used in electrical wiring. 1. copper wire 2. aluminium wire 1. single strand 2. multi strand
- Single core :-A wire is a single, usually cylindrical, flexible strand or rod of metal. ... The term wire is also used more loosely to refer to a bundle of such strands, as in "multi stranded wire", which is more correctly termed a wire rope in mechanics, or a cable in electricity.
- Two core wire :- Its wire we use any where there we connect the connection the line and neutral.
-

- Three core wire :-This wire we used where we connect the line neutral and earthing.

- Four core wire\ five core:- this wire used mainly three phase supply.
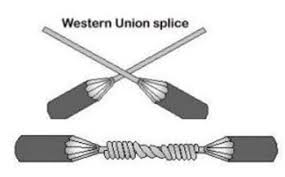
Wire joint
- Union joint :- both side of wire crossing each other and joint two side is called union joint.

- Marid joint :- Arrange all wire and mixed wire to each other and joint and pinch is called marid joint .
- Britannia joint :- this connection is joint to heavy gauges wire and industrial wiring.
- T- joint :- take connection from middle of wire is called t joint.
Practical no:- 05
Electric Basics
Electric basic means Trip, load, short-circuit,open circuit, close circuit, transformer, conductor, fuse, wire, etc
- Trip:- A circuit breaker " trip" means shut off the electrical flow to protect the circuit from overheating and casing a damage.
- Load:- A electrical load is an electrical component or portion of a circuit that consumes electric power.
- Short-circuit:- When exposed electrical wire touch and may result in damage to your home or appliances.
- Open-circuit:- An electrical circuit in which the continuity is broken so that current does not flow source to source.
- Close-circuit:- Close circuit means a complete electrical connection around which current flow and circulates.
- Transformer:- A transformer is static electrical device that transfers electric energy between two or more circuits through electromagnetic induction.
- Conductor:- An electrical conductor is a substance in which electrical charge carriers usually electrons move easily from atom to with the application of voltage.
- Fuse:- A fuse is an electrical safety device that operates to provide over-current protection of an electrical circuit.
- Wire :- A wire is a single , usually cylindrical flexible strand of rod of metal wire are used to bear mechanical loads of electricity.
practical no :-06
Load calculation
Aim:- Calculating the electric Load
Requirements:- Pen, Book, and etc.
Procedure:- While calculating the load the main value is wattage load calculation to total value of voltage.
We know that how to count the load .
# How to find electric appliances wattage
watt=amp*volt
# how to find unit
watt*hours
1000
#Rate wise slap per unit
Requirements:- Pen, Book, and etc.
Procedure:- While calculating the load the main value is wattage load calculation to total value of voltage.
We know that how to count the load .
# How to find electric appliances wattage
watt=amp*volt
# how to find unit
watt*hours
1000
#Rate wise slap per unit
Unit
|
Rate per unit
|
0-100 unit
|
3/-
|
100-300 unit
|
7.73/-
|
301-500 unit
|
9.70/-
|
501-1000 unit
|
11.20/-
|
1001- more
|
12.48/-
|
PRACTICAL NO :-07
Electric circuits
Aim:- Using different types of circuit.
Tools :-Tester, piler, stripper.
Materials:- Bulb, Box, Holder, 2.5mm Wire, Switches.
Procedure:-
Simple circuit - a simple circuits contains 3 components necessary to have functioning electric circuit namely a source of voltage a conductivity.

parallel circuits - In parallel arrangement each circuits event is connected to the terminal of the battery independent of the other circuit elements voltage are same.
series circuit- In a series circuit the current through each of the components is the same and the voltage across the circuit . the circuit is same of the voltage across each components current is same and voltage are divided.
Practical no :- 08
Healthy earthing
Aim:- Creating a healthy earthing .
Tools:- Shovel , tub, par, plier, stripper.
Materials:- Coal, salt, g.i pipe, pvc pipe, wire.
Procedure :- 1) We want to create a healthy earthing
3) we decide to make it an artificial earthing .
4) we digging the soil by measuring 4 feet.
5) Then we insert g.i pipe
6) we layered a hit by salt coal and bricks .
7) we poured some water to finish to end.
Observation:- we saw that land condition was rocky thus making an earthing there a big risk because there is more resistance in rock then soil.
water would not get observed because there were rocks.

Practical no :- 09
Bio- coal
Aim:- To make artificial and Bio-coal
Requirements:- Tin barrel, Tin pipe, Match box, Bio waste, wheat powder.
Procedure:- 1) We take a tin barrel and we make hole on tin barrel at the part of side surface and upper part of barrel .
2) We put in barrel bio waste and cover the barrel with help of barrel lid.
3) We burn the bio waste to help of match box . burning bio waste like dry leaf for three to four hours.
4) After extinguish the fire we remove the charcoal in it and after some time we make the powder .
5) Then add wheat powder for stickness and for giving shape.
6)Then we make oval shape of charcoal and put in sunlight for drying a coal .
7) After give a bio coal for cooking .
Observation :- 1) When we burn a bio waste it will be burn fastly .
2) When we burn it the smoke was coming out of the barrel it is harmful to us for breathing we stand in near of barrel.
Practical no :- 10
house wiring
Aim:- To do house wiring .
Tools:- Tester, stripper, plier, screw driver, drill machine, level tube, hammer etc.
Materials:- board, wires, casing patti, tubes, bulb, switches, socket, etc.
Procedure:- 1) First you should know the height from the floor where you are going to do the work this is very important.
2)Using level tube to make straight line where you are working to a wiring and casing capping .
3) First drill hole s and fit casing to the wall using screw .
4) Then fix the electric board in the proper place .
5) Then finalized the wire gauge depending on the load which we are going to use .
6) Then do all connection properly cross check it again and start the supply and see it is working as not.
7) Fix proper line neutral and phase on the board and load.
Observation:- We observe that this work need patience and management.

Practical no:- 11 Solar cooker
Aim:- Cooking rice without use fossil fueld Tools:- Vessel, solar cooker, spoon, plate and etc. Materials:- Rice, water, salt etc. Procedure:- 1) Firstly we washed and cleaned the solar cooker as it was not used for long time.
2)We take 100 grams rice we washed the rice.
3) We puored water and put salt in it as you want ta taste
4) We placed the cooker at such as place where there is more sunlight .
5) We checked the process after 2 hours.
Observation:- We observed the solar cooker almost the same quality of a food as in a gas cooker.
Conclusion:- Solar a renewable resource which we can use again and again .
Sr. no
|
Ingredients name
|
Date
|
Weight
|
Starting time
|
Ending time
|
1
|
pulses
|
2-3-18
|
10 kg
|
12:00
|
4:00
|
2
|
Pulses
|
3-3-18
|
5kg
|
12:00
|
4:00
|
3
|
Lady finger
|
4-3-18
|
5kg
|
1:00
|
3:30
|
4
|
Pulses
|
5-3-18
|
450gms
|
10:00
|
|
5
|
Pulses
|
6-3-18
|
445gms
|
10:40
|
2:00
|
6
|
Double b
|
7-3-18
|
6kg
|
11:00
|
1:00
|
7
|
Pulses
|
8-3-18
|
2.5kg
|
10:00
|
12:10
|
8
|
Palak
|
9-3-18
|
6kg
|
12:00
|
3:30
|
9
|
Pulses
|
10-3-18
|
2.5kg
|
11:00
|
12:50
|
10
|
pulses
|
11-31-8
|
2.5kg
|
11:30
|
Practical no:- 12
Ohm's law Aim:- To study about Ohm's law
Required:- Resistor about 5 ohm, ammeter, voltmeter, plug, holder, wire, bulb etc
Procedure:- 1) Draw the circuit diagram first 2) Arrange all apparatus as per circuit diagram. 3) Make connections as per circuit diagram. all connection must be neat and tight take care to connect the ammeter and voltmeter with their correct polarity ( +ve to +ve and -ve to -ve ) 4) Pass through supply in bulb and count volt and current by according ohm law
# Ohm's law The potential difference (voltage) across and ideal conductor is proportional to current through it the constant of proportionality is called " Resistance" R Ohm's law is given ;- V=IR where V is the potential difference between two point which include a resistance R
# Ohm' law formula V=IR
# Ohm's law circuit diagram
Aim:- To use bio gas plant
Required:- fresh dung, water, meter tape, calculator etc.
Procedure:- 1) Mix a fresh dung and water with right proportion in the inlet tank as per capacity of bio gas plant . 2) Continue the above procedure in summer winter and rainy season for minimum seven days regularly .
3) Observe the production of gas during feed period
4) student should be give demonstration and assignment to carry out daily feeding weekly and monthly maintenance.
5) the gate valves should be opened when the gas has to be actually used. this will avoid the unnecessary wastage of gas.
# Daily maintenance
1) Add the recommended quantity of raw material
2) use proper slurry mixture.
3) use clean feed stock free from soil and straws
Observation:- 1) Keep a record of feed and the gas generated
2) gas generated can be measured either by gas meter or manually
Conclusion:- Similarly we can calculate consumption of gas for cooking food running generator

Aim:- to know about humidity, temperature in our environment .
Required:- book, pen, dry bulb, wet bulb, thermometer.
Procedure:- First we know about humidity. What is humidity and temperature. dry and wet bulb.
# How to find humidity, temperature, and rainfall.
# Humidity:- Humidity is the amount of water vapor present in the air. water vapor is the gases state of water and is invisible to the human eye.
# How to measured humidity:- First take take two thermometer. Dry bulb and Wet bulb difference between dry and wet bulb ex:- 22 dry and 15 wet different is 7 Take humidity chart and find humidity.
# Temperature:- Temperature is a physical quantity expressing hot and cold temperature is measured with a thermometer.
# How to measured temperature:- Watch in the thermometer mercury is present in which number of Centigrade


Sr.
no
|
date
|
minimum
|
maximam
|
Dry
blub
|
Wet
blub
|
Himidyuty
+
|
1
|
1-2-18
|
11
|
23
|
23
|
15
|
38
|
2
|
2-2-18
|
9
|
19
|
21
|
15
|
46
|
3
|
3-2-18
|
11
|
22
|
23
|
16
|
45
|
4
|
4-2-18
|
11
|
22
|
24
|
16
|
39
|
5
|
5-2-18
|
11
|
25
|
23
|
16
|
45
|
6
|
6-2-18
|
11
|
22
|
24
|
17
|
36
|
7
|
7-2-18
|
9
|
20
|
21
|
17
|
58
|
8
|
8-2-18
|
9
|
19
|
21
|
16
|
59
|
9
|
9-2-18
|
12
|
21
|
23
|
15
|
46
|
10
|
10-2-18
|
8
|
20
|
20
|
15
|
57
|
Practical no :- 15
motor starter
Aim-: working and connection of a motor starter.
Requirements-: Tester, series lamp, copper wires.
Procedure-:


1) We look a mechanical starter from the artificial pond.
2) We opened it separated the parts and studied them carefully.
3)We checked the no of volt coil on the series lamp.
4)We brushed the contractor as a carbon residue forms after long time of use.
5)We saw the thermal relay that contains a bio-metallic strips.
Observation-; while testing the no of volt of coil we saw that when we passed the current through the no of volt coil turned in to electromagnetic.
Conclusion-: We concluded that we can use a mcb instead of a motor starter


Opened CD drive

Mechanisms which I am going to use for X and Y axis.

Costing for my CNC Plotter
PROJECT REPORT
2018-19
Mini CNC Plotter MACHINE
○ What is a Plotter Machine?
● The Plotter is a computer printer for printing vector graphics. In the past, plotters were used in applications such as computer-aided design, though they have generally been replaced with wide-format conventional printers. A plotter gives a hard copy of the output. It draws pictures on a paper using a pen. Plotters are used to print designs of ships and machines, plans for buildings and so on.
○ Materials
● Arduino UNO ---1
● L293D Motor Shield ---1
● Mini Servo Motor ---1
● CD-ROM Drives ---2
● 50mm long Nuts and Bolts ---8
● Pen ---1
○ Software
● Arduino IDE
● Processing IDE
● Inkscape ( Version 0.48.5 )
○ Servo Motor
● Servo motor Consists of 4 important components
■ Input Potentiometer
■ Error Detector
■ Amplifier
■ Motor
■ Feedback Potentiometer
● Input Potentiometer controls voltage signals.
● Error Detector detects errors.
● Error Detector consists two 1,000 Ohm Resistors.
● The Amplifier is limited to an output of either +12V or -12V.
● If the Error Detector has same Voltage on both sides their sum will be 0V. So, input on the Amplifier will be 0V thus stopping the motor.
● The Feedback Potentiometer turns the same angle as the Load on the motor and sends that signal back to the error detector.
● The Motor consists of a gearbox which is effective in controlling the speed of the motor efficiently.
● I built my Mini CNC Plotter with the help of this link
● Electricdiylab.com
Some Photos of my Mini Plotter
Completed CNC Plotter


Opened CD drive

Mechanisms which I am going to use for X and Y axis.

Costing for my CNC Plotter
Sr.
|
Materials
|
Price per Unit
|
Quantity
|
Total Price
|
|
1.
|
CD Drives
|
60
|
2
|
120
|
|
2.
|
Arduino
|
450
|
1
|
450
|
|
3.
|
Motor Shield
|
650
|
1
|
650
|
|
4.
|
Acrylic Bed
|
7
|
1
|
7
|
|
5.
|
Acrylic Penholders
|
1.6
|
6
|
9.6
|
|
6.
|
Mini Servo
|
150
|
1
|
150
|
|
7.
|
Jumper Wires
|
2.7
|
8
|
21.6
|
|
8.
|
Hot Glue Stick
|
15
|
2
|
30
|
|
9.
|
Screws and Bolts
|
5
|
8
|
40
|
|
10.
|
Pen
|
2
|
1
|
2
|
|
Total
|
Rs. 1,4
|
||||


Thanks for this updated list. Waiting for more sites...
ReplyDeleteAluminium Scaffolding Manufacturer
This is truly a great read for me. I have bookmarked it and I am looking forward to reading new articles. Keep up the good work!. Impact Wrench Guides
ReplyDeleteYou made such an interesting piece to read, giving every subject enlightenment for us to gain knowledge. Thanks for sharing the such information with us to read this...
ReplyDeletehvca diodes
Thanks For sharing this Superb article.I use this Article to show my assignment in college.it is useful For me Great Work. Big chief carts
ReplyDeletehow to vape charlotte's web cbd oil Certain dissertation web sites over the internet courses currently have evidently unveiled while in the web-site.
ReplyDeletewhere to buy cbd vape oil houstonn texas I really appreciate this wonderful post that you have provided for us. I assure this would be beneficial for most of the people.
ReplyDeleteI haven’t any word to appreciate this post.....Really i am impressed from this post....the person who create this post it was a great human..thanks for shared this with us. Can you vape CBD oil?
ReplyDelete